Good sensitivity settings are really important in BGMI to control your aim and sprays on enemies. Copying other player’s sensitivity won’t give one the control they have, but one needs to practice with their own to master it. However, there are some basic settings one can start with. Once the player gets comfortable, adjust them to suit the preferences of the player. Here we’ll discuss the best BGMI sensitivity settings for beginners.
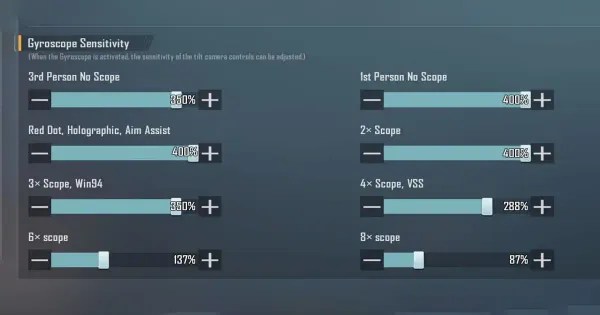
These are gyroscope sensitivity settings, so players need to enable the gyroscope first. These settings are moderate, so try them out on the training ground first and practice for at least an hour with the scopes that the player usually uses. If gun sprays are shaky, gradually adjust the sensitivity until the spray becomes stable. Do this for each scope and each sensitivity setting: camera, ADS, and gyro.
Best BGMI Sensitivity Settings
Camera Sensitivity
-
TPP No Scope – 150%
-
FPP No Scope – 150%
-
Red Dot, Holo, Iron Sight, and Canted Sight – 40%
-
2x Scope – 40%
-
3x Scope – 30%
-
4x Scope – 30%
-
6x Scope – 15%
-
8x Scope – 15%
ADS Sensitivity
-
TPP No Scope – 50%
-
FPP No Scope – 120%
-
Red Dot, Holo, Aim Assist – 50%
-
2x Scope – 50%
-
3x Scope – 35%
-
4x Scope – 35%
-
6x Scope – 15%
-
8x Scope – 15%
-
TPP Aim – 40%
-
FPP Aim – 30%
Gyroscope Sensitivity
-
TPP No Scope – 300%
-
FPP No Scope – 300%
-
Red Dot, Holo, Iron Sight, and Canted Sight – 300%
-
2x Scope – 300%
-
3x Scope – 300%
-
4x Scope – 150%
-
6x Scope – 70%
-
8x Scope – 60%
-
TPP Aim – 30%
-
FPP Aim – 20%
ADS Gyroscope Sensitivity
-
TPP No Scope – 300%
-
FPP No Scope – 300%
-
Red Dot, Holo, Iron Sight, and Canted Sight – 300%
-
2x Scope – 300%
-
3x Scope – 200%
-
4x Scope – 150%
-
6x Scope – 70%
-
8x Scope – 60%
-
TPP Aim – 300%
-
FPP Aim – 200%
Basic Settings
Fire Settings
-
Display Left-Side Fire Button – Always On
-
Bolt Action Rifle & Crossbow Firing Mode – Tap
-
Shotgun Firing Mode – Tap
Scope Settings
-
Scope Mode – Hold
-
Camera Rotation while ADS – Enable
-
Quick Scope Switch – Enable
-
Canted Sight Button – Tap to Switch
-
Focal Lenght Adjustment – Tap
Peek Settings
-
Peek – Enable
-
Peak Mode – Hold
-
Peek & Open Scope – Disable
-
Camera Rotation While Leaning – Enable
Advanced Controls
-
Universal Mask – Enable
-
Mark Assist – Enable
-
Headshot Sound Effect – Enable
-
Jump/Climb – Separate
-
Merge Crouch and Prome – Disable
-
Quick Throw – Enable
-
Throwables Quick Wheel – Switch
-
Throw Consumables – Disable
-
Transparent UI Mode – Disable
-
Slide (Arena) – Enable
-
FPP Swap – Enable
-
FPP Dynamic Holding – Enable
-
TPP – 80
-
Sprint Sensitivity – 100%
-
FPP – 90
-
Mark Style – Classic
Assist Features
-
Aim Assist – Enable
-
Main Screen Audio Markers – Only in Aftermath
-
Auto- Mark Hit Locations – Enable
-
Healing Prompt – Enable
-
Continuously Use Bandages – Enable
-
Auto Open Doors – Enable
-
Blocked Sight Warning – Enable
-
Horizontal Swipe Accelerations – Enable
-
Match Auto Message – Enable
-
Hold to Open Map – Disable
-
Show Throwables Trajectory Line – Enable
-
Auto Equip Melee Weapon (Put Away Firearm) – Disable
-
Default Melee Weapon Carried – Dagger
-
Reload Interrupt Method – Fire Interrupt
-
Auto Jump – Disable
-
Tap to Mark Location – Disable ‘
-
Default Parachute Follow – Enable
Aim
-
Aim Features – Enable
-
Aim – Hold
-
Aim Camera Rotation Feature – Enable
Gamers need to remember that they have to stick with one sensitivity setting to master it. Don’t change it frequently; practice with it in classic matches. Some games might not go well initially, but players will adapt to the settings over time.
